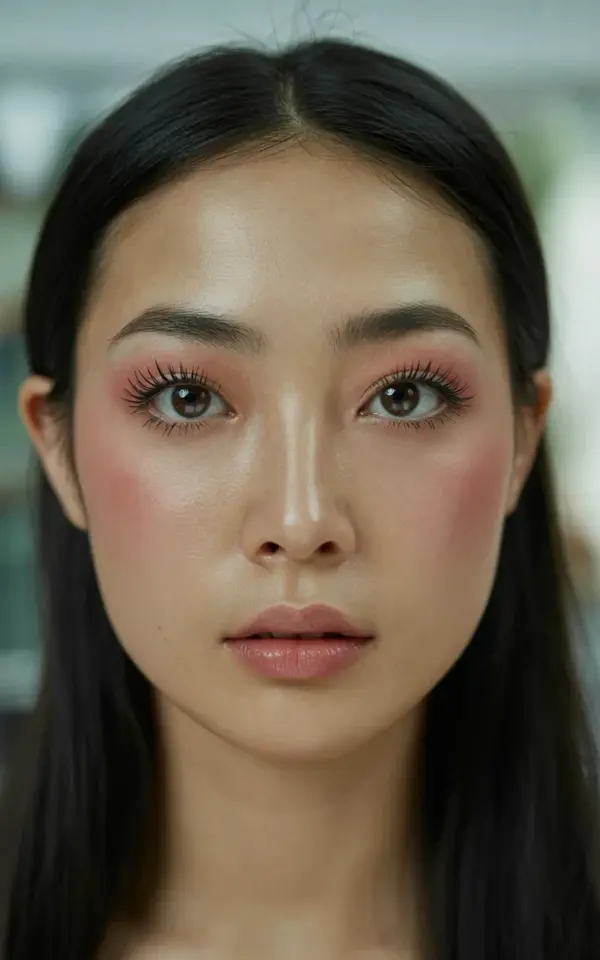
There’s a specific kind of confidence that comes from wearing makeup that feels like skin, and the woman in this photo has it. I’m talking about that effortless, lit-from-within look that started with a simple budget natural makeup tutorial and ended with my now-signature dewy glow. While I could spend hours browsing luxury beauty sites, the truth is, this entire makeup look cost me under forty dollars to recreate. And honestly, it performed better than some of my high-end favorites.
The inspiration is right there in the close-up: smooth, dewy texture, soft pink blush, and lips in a natural mauve shade. The lighting hits the skin gently, giving it that warm, fresh undertone without looking greasy or heavy. For a casual makeup day, this is the gold standard. I wanted to figure out how to get that exact finish without breaking the bank, and after a few trials and errors, I finally nailed the routine. Here is what actually worked for me.
## The Prep Work: Skincare as the Real Base
You cannot fake dew with a dry face. I learned this the hard way after my first attempt looked cakey and settled into every tiny line I didn’t know I had. The secret to a natural makeup tutorial that glows is starting with a hydration sandwich. I apply a light layer of water-based gel moisturizer, let it sink in for two minutes, and then I spray a facial mist with glycerin and squalane.
On days when my skin feels extra tired, I add a tiny drop of facial oil mixed into my foundation. It sounds counterintuitive, but oil creates that “your skin but better” effect that powder alone can’t achieve. Just beware if you have oily skin like me, you might blot your nose by the afternoon. That is normal and not a sign of failure.
## Building the Dewy Glow Cheap: Drugstore Foundation Hack
The base is where most budget makeup fails, so pay attention. Instead of a heavy, full-coverage matte foundation, I reach for a lightweight skin tint that has a luminous finish. The shade range for these tinted moisturizers is usually forgiving, which is perfect for getting the right warm undertone on a tight budget. I apply it with my fingers, pressing it into the skin rather than swiping it around.
Look, the real trick is dimethicone. It sounds scary, but it is that silicone ingredient found in many affordable primers and foundations. It smooths over pores and gives the skin that blurred, soft-focus effect. I specifically look for a foundation with skin-loving ingredients like hyaluronic acid instead of heavy waxes. Then, I take a damp beauty sponge, squeeze out all the excess water, and bounce it over my face to press everything into one cohesive layer.
## Cream Blush Placement for a Lit-From-Within Effect
Ok so, the soft pink blush in the photo is doing a lot of heavy lifting. You cannot use a standard powder for this; you need a cream blush that melts into the foundation. I have a five-dollar gel blush that I swear by, specifically in a shade called “Cheeky Rose” that mimics the natural flush you get after a light jog.
The application method is more important than the price of the product. I smile and apply the cream blush to the apples of my cheeks, but here is the secret, I never blend up toward my temples. Instead, I blend outward and slightly down, toward my ear. This gives a youthful, fresh look rather than that high-fashion, sculpted cheekbone vibe. It also makes me look like I naturally have great blood circulation.
– **Smart tip:** Use the same cream blush on your eyelid
– **Another pro move:** Press it onto your lips before applying your lipstick
– **Final trick:** If it looks too intense, press a bit of translucent powder over it, but do not rub
## Natural Mauve Lips: The Ultimate Everyday Shade
Mauve is one of those rare lip colors that looks good on almost every skin tone. It sits somewhere between a rosy pink and a muted plum, which makes it perfect for a natural makeup tutorial. I apply the mauve lipstick straight from the bullet tube to the center of my lips, and then I use my ring finger to tap it outward toward the edges.
This leaves the lip line a little undefined, which is exactly what you want for that casual makeup day vibe. Honestly, I tried a mauve liquid lipstick once and it was a disaster. It dried down too dark and made me look like a Victorian ghost. The satin lipstick formula is non-negotiable for this budget look because it has enough slip to keep you comfortable for hours without cracking.
## Locking It In: Setting Without Killing the Glow
Most people make the mistake of spraying a setting spray that adds shine and calls it a day. For this look, I use a facial mist that has a pipette in the cap and a slightly tacky finish. It has to have that tacky element because that is what actually makes the makeup last. The hydrating mists just make your face wet, and everything slides right off.
For the under-eye area, do not use powder. The photo shows smooth, dewy texture under the eyes and that should remain untouched. I press a tiny amount of loose setting powder only along my nose, my chin, and my forehead. That keeps the oils from breaking through the skin tint while leaving my cheeks, which had the blush, glowing like a highlighter commercial.
## The Inner Corner Highlight and Everyday Lashes
You see that specific sparkle in the inner corner of the eye in the picture? That’s not a metallic shadow or a glitter pigment. That’s a matte-off-white shadow that just catches the light. This is my favorite budget makeup hack because it makes your eyes look instantly awake. I use a tiny pencil brush to place it right next to the tear duct, and it does the job of caffeine, honestly.
For the lashes, I skip the false lashes and heavy waterproof mascara. I use a regular affordable mascara that doesn’t smudge, and I hold the wand vertically at the outer edges of my lashes to give them that subtle lifted effect. It doesn’t give you huge, dramatic lashes, but it looks natural like your actual lashes are just that good.
## Down-to-Earth Finishing Notes
Putting this natural makeup look together taught me that makeup is a conversation between your complexion and the products you choose. It is not about hiding or masking, but about freshening up what you already have going on. The cool mint green background in the photo makes the warm undertones and pink blush pop, and I think that contrast is what makes the whole image feel so calm and collected.
This budget natural makeup tutorial has become my lazy weekend uniform. You get the dewy glow, the beautiful mauve lips, and all of the freshness with none of the fuss. If you try this look, let me know how the cream blush placement works for your face shape. I am betting you will love the outcome, but if you don’t, I have a few other drugstore hacks up my sleeve. Save this guide for your next casual makeup day, you deserve an easy glow.
Leave a Comment