Why This Bronzy Glowing Look Feels Like “Me” Every Time
I came to this bronzy makeup tutorial after way too many failed attempts at looking “dewy” without slipping into grease-ball territory. You know the struggle. You layer on highlighter, set everything with powder, and somehow your face still looks flat an hour later. Not cool. I have medium skin with warm undertones and a tendency to get shiny in my T-zone, so finding a balance between luminous and sweaty took some experimenting. This specific combination of warm bronze shadows, a sharp winged liner, and a glossy nude lip finally clicked. And yes, I get compliments every single time I wear it. Especially on my freckles, which usually hide under foundation.
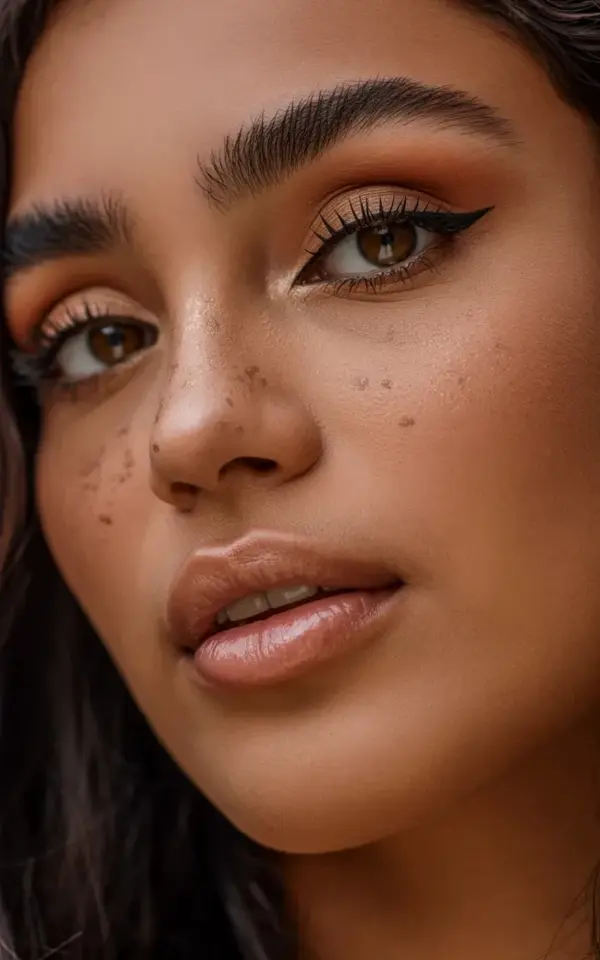
The photo here shows exactly what I’m talking about: that soft, warm glow on a medium-dark complexion, with defined brows and long lashes that don’t steal attention from the liner. Look at the subtle freckles across the nose and cheeks, they’re visible but not competing with the eyeshadow. That’s the goal. I want bronzymakeup that feels intentional but not heavy. And I think we nailed it.
Prepping for That Dewyglow Without the Grease Factor
Here’s the thing: if you skip primer or use the wrong moisturizer, that dewyglow turns into a puddle by lunch. I learned that the hard way during a humid outdoor brunch. Now I start with a gel-based hydrating moisturizer (no oils) and let it sink in for five minutes. Then I use a luminous primer only on the high points of my face, cheekbones, brow bone, a swipe down the nose. Never all over. That little distinction makes a massive difference on medium skin tones because our natural warmth doesn’t need as much help.
For foundation I mix a drop of liquid luminizer with my regular medium-coverage base. But here’s the weird trick: I apply it with a damp sponge and then press a tiny amount of translucent powder only around my nose and the inner corners of my eyes. I let the rest of my face stay damp. Honestly, pressing powder anywhere else would kill the glow. And my freckles? I keep them uncovered. A light hand is everything.
- Gel moisturizer, wait until fully absorbed
- Luminous primer only on cheekbones and brow bone
- One drop of liquid luminizer mixed into foundation
- Powder only on nose and inner eye area
- Skip concealer on freckles, let them show
I stole that last tip from a makeup artist I followed obsessively on Instagram. She said covering freckles is like buying a fancy couch and then covering it with a plastic sheet. Why dull the best part?
The Eyeshadow Sandwich: Bronze, Blend, and Wing
For this look I used two matte brown shadows (one soft warm brown, one deeper reddish-brown) plus a shimmery bronze topper. No complicated cuts or crease maps. I start with the soft brown all over the lid, then deepen the outer V with the reddish-brown. Then I pat the bronze onto the center of the lid and a little under the lower lash line. That’s it. The real magic happens when you blend the edges with a clean fluffy brush, take your time, like 30 seconds per side. Rushing makes muddy.
Now the wingedliner. This is what used to terrify me. I have slightly hooded eyes, so a thick wing disappears. I had to adjust. The trick I finally landed on: draw the wing with a fine-tipped liquid liner while looking straight into the mirror with your face at rest. Not tilting your head. I draw a line from the outer corner of my eye toward the end of my brow. Then I connect it to the lash line. Then I fill in. It sounds simple, but it took me maybe ten tries before the angles looked symmetrical. I will admit I used a small angled brush dipped in concealer to clean up the edges, exactly like the photo here shows. That concealer step is non-negotiable if you want a crisp wing without starting over.
How I Get That Sharp Wing Without Crying About It
Okay so here is the honest truth: I keep a Q-tip dipped in micellar water next to me the entire time. Not because I plan to mess up, but because I always do. At least once. The trick is to let the liner dry for a couple seconds before correcting. If you try to wipe it while wet, it smears into a gray cloud. Not cute. Use the Q-tip to chisel the edge, then reapply concealer with that same small angled brush. The brush I use is honestly from a drugstore set I bought in 2019 and it has a bent tip that I hate for everything except this one job. Go figure.
For medium skin tones like mine, black liner can look too harsh. I use a deep brown liquid liner instead. It still gives drama but matches the warmth of the bronze shadow. The winged liner in the photo here is that deep brown, not true black. And the lash? I did a single coat of volumizing mascara, then used a lash curler after the mascara was half-dry to hold the curl. That’s a random tip I learned from a Korean beauty blog, curling after mascara gives a longer, more lifted curl than before.
Glossy Nude Lips and the Freckle Factor
I tried a matte lip with this look once and immediately felt like I was wearing a costume. The whole point of mediumskinmakeup with a dewy finish is to feel like “you but better.” So I go for a nude gloss with a hint of peach. Not a sticky gloss, one that feels like oil on your lips. Those last longer and don’t make your hair stick to your mouth. I line my lips with a neutral pencil that matches my natural lip color (not lighter, not darker) and then glaze the gloss on top. That’s it. No overlining, no blotting.
Now the freckles. I mentioned them twice because they matter to me. In the photo they’re clearly visible across the nose and cheeks. To help them show through, I avoid heavy foundation there and I don’t powder. But if you were blessed with less obvious freckles, you can fake them with a brow pen. Don’t make them perfectly round. Just tiny dots in a scattered pattern. The gloss on the lips and the dew on the skin make the whole face look like one cohesive glow, and freckles are part of that glow.
A Weird Little Detail About Lighting and Photos
I’m going to go off the usual tutorial path for a second. The lighting in the reference photo is warm and soft, almost golden hour. That light matters. If you recreate this look for a night out, you’ll see the bronze shimmer pop under club lights or dim restaurants. But if you take a selfie with harsh overhead white light, the dew will look like oil slick. I swear. I once wore this exact look to a fluorescent-lit pharmacy and looked like a disco ball that had been dropped in butter. My point: check your mirrors in multiple lights. Or just avoid the pharmacy. Your call.
Also, I should mention I have dark hair that falls in front of my face on the left side, like in the photo. That creates a shadow that makes the bronzy glow look even more dimensional. If you have a similar face shape, consider the hair placement part of the makeup. Sounds ridiculous but it works.
Putting It All Together – Your Go-To Weekend Look
This whole routine takes me about 25 minutes now, down from an hour when I first tried. The main time sinks are blending the eyeshadow and cleaning the wing edges. If you can shave those down, the rest is fast. I keep a makeuptutorial mentality even when I’m in a rush: one eye at a time, let things dry, clean as you go. Don’t rush the concealer step.
I genuinely think this is the most flattering look for medium skin tones that want warmth and glow without looking overdone. The bronze shadow brings out the golden undertones in the skin, the wing adds sharpness without aggression, and the nude gloss keeps everything grounded. And the best part? You can still see yourself in the mirror. Your face. Your freckles. Your eyes. Just enhanced.
Try It and Tell Me How It Goes
Honestly, I’d love to hear if this works for you. The wing liner step took me forever to figure out, so if you have a different trick that works better for hooded eyes or oily lids, drop it in the comments. Or tweak the bronze shadow to a copper tone if your skin runs warmer than mine. This is a template, not a rule. Just keep the dew and don’t bury your freckles. That’s the whole point.
#bronzymakeup #wingedliner #dewyglow #makeuptutorial #mediumskinmakeup
Leave a Comment