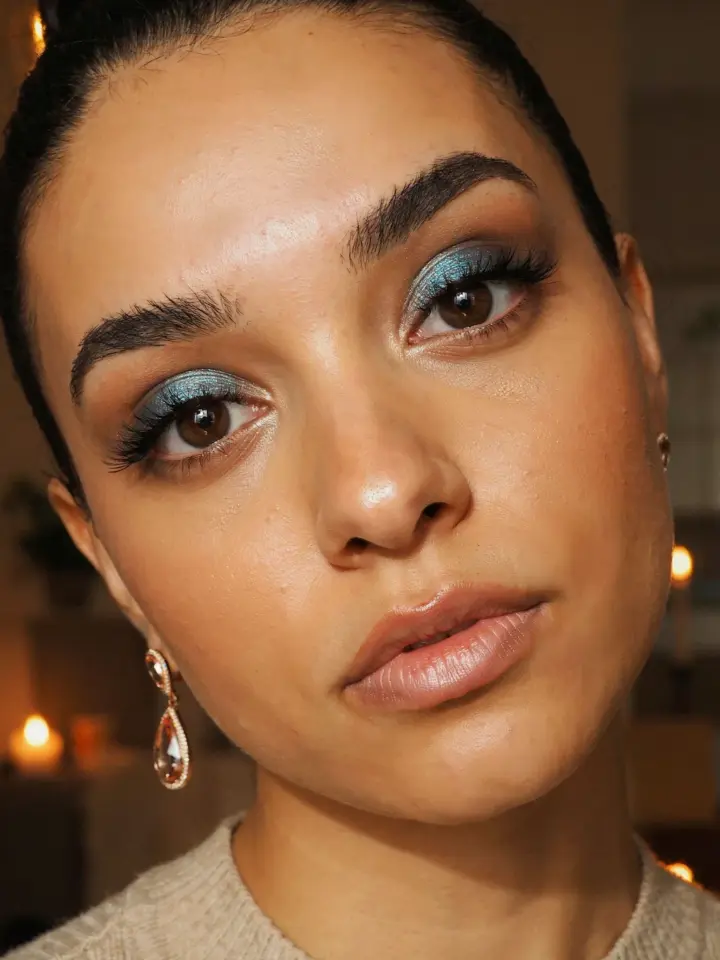
You picked out a beautiful, pigmented teal shadow, spent twenty minutes blending, and the result looked like a bruise. It is not your skill level, those brushes are fine, and honestly, that eyeshadow is probably great. The real culprit is what is underneath it, which is usually nothing at all. This is the exact moment most people give up on colorful eye looks, and I want to stop you right there before you retreat back to taupe.
Look, your lids are not white. They are a weird mix of red, yellow, and blue undertones that show up through any shadow you place on top. When you swirl a bright orange or a vivid blue over bare skin, that skin tone mixes with the pigment. The color gets dirty, the edges look unclear, and you lose all the pop you saw in the pan. This is why every professional makeup artist you see on video always reaches for something white first. It is not a fancy trick, it is the literal foundation of bold eye makeup.
Why Your Colorful Eye Makeup Turns Muddy (It’s Not Your Brushes)
I have watched so many tutorials where people get frustrated and blame their cheap eyeshadow palette. They buy a better one, the same thing happens, and they conclude they are just bad at makeup. But the shadow is not muddy because it is low quality, it is muddy because it is being painted onto a surface that looks like a faint sunburn. A white base cancels out all the natural discoloration on your eyelid. It gives the pigment a blank canvas so the color stays exactly as saturated as it is in the compact.
Think about painting a wall. You would not slap a bright red paint over a wall that has grease stains and old crayon marks on it. You would prime it first. Your eyelid is that grease-stained wall, and white cream eyeshadow is the primer. This applies to every single shade, but it matters most for pastels, neons, and any metallic that claims to be high-impact. Without the white layer, you are just fighting your own skin.
The White Base Trick Every Bold Eye Makeup Idea Depends On
Ok so here is the thing about a white base: it is not just for blanking out your eyelid. It also gives the shadow something to grip onto. Powders slide around on bare skin, especially if you have even a tiny bit of natural oil on your lid. A tacky white cream acts like a magnet, holding each particle of pigment exactly where you put it. This makes blending easier, not harder, although I know it feels weird at first to work with a sticky lid.
For anyone attempting a cut crease, this step is non-negotiable. You cannot cut a sharp line into a dusty lid. But with a white base, you can carve out that socket line with total precision. The bright white also makes the transition between your crease color and your lid color look like a professional special effect. Honestly, without it, your crease looks like a shadow, and not the eyeshadow kind, just a general messy area.
How to Pick Your White Base for Colorful Eye Looks
There are a few different routes you can go, and the right one depends on how much texture you have on your lids.
- White eyeliner pencil: this is the fastest option, it is waxy, cheap, and you can find it at any drugstore. It is perfect for a quick swipe of color on the go, but it can crease if you have oily lids.
- White cream eyeshadow in a pot: this is the workhorse. It is thicker, more pigmented, and dries down to a base that stays put all day. It takes a little longer to blend out, but that extra time is worth it for a full night out.
- White liquid eyeshadow: this is for extreme intensity, like if you are doing a neon editorial look. It dries super fast, so you have to work quickly, but the payoff is unreal.
I have a weird preference for the pot creams myself, and not gonna lie, I have one that is so old the label is rubbed off. It still works perfectly, so do not throw yours away just because it looks a little messy. The texture matters more than the brand. If it is too dry, it will drag on your lid. If it is too wet, the shadow will skip over it. Try a couple until you find one that feels smooth, not sticky.
How to Apply a White Base Without Ruining Your Work
The biggest issue people run into is applying way too much product. You do not need a thick layer of white goop on your eye. Less is more here. Use your ring finger or a flat synthetic brush and tap a thin, even layer over the lid, stopping right at the crease. If you plan to blend color above the crease, extend the white slightly upward with the residue left on your finger.
Do not blend it back and forth like you are applying a moisturizer. That creates a patchy, uneven surface. Just pat it in, one section at a time, until the skin tone is neutralized. If you load on too much, you will end up with a dry, cakey mess that crumbles under your shadow. I did this the first time, it looked like I had covered my eye in whiteout, and the shadow refused to stick to the worst parts. A thin layer is genuinely all you need.
This also reminds me of a time in middle school when I used a thick white hair gel on my eyebrows instead of actual brow gel. It looked terrible, obviously. But it taught me that the word “gel” on the label does not mean it belongs on your face, and the same logic applies to cream bases. Just because a product is white does not mean it is created equal.
Fixing Issues When Your Bold Eye Makeup Goes Wrong
What if you already tried this and the color still looks off? Let us troubleshoot. If your shadow is fading within an hour, your base was probably too oily. Set it with a dusting of loose translucent powder before you add your color. Or, if you see creasing, try a thinner layer of base, and make sure you are not accidentally applying it too close to your lash line where your natural oils are the strongest.
Another common problem is that the white base itself shows through after you blend. This happens when you are not packing enough color on top. Use a dense packing brush and press the eyeshadow onto the base instead of swiping it. Swiping moves the white around and mixes it with the pigment. Pressing keeps them separate. If you still see white peeking through, go back in with another layer of shadow, not another layer of base.
How to Wear These Eye Makeup Ideas Beyond the Weekend
I know the thought of a bright red lid on a Tuesday morning is intimidating. But you do not have to go full editorial for the office. Use the white base on the center of the lid and then apply a soft wash of color there, like a peach or a soft lilac. Keep the rest of your face minimal, no bold lip, skip the heavy contour. That way the eye is the only focus, and it looks intentional, not messy.
For a night out, you can go wild with the full white base and a cut crease. But for daytime, try just popping a matte terracotta or a muted sage across the whole lid. A white base will still make those colors look more vivid than they would on bare skin, but they remain work-appropriate. It is all about the specific shade you choose, not the technique. The technique stays the same.
The Cleanup Secret That Makes Colorful Makeup Look Expensive
Ever noticed how professional eye makeup always has a razor-sharp edge? That is not entirely skill, it is concealer. After you finish your colorful eye look and the shadow is perfectly blended, take a flat brush and some concealer that matches your skin tone. Trace along the lower edge of the shadow to clean up any fallout. This instantly lifts the eye and makes the whole look feel polished.
This matters even more with colorful makeup than neutral makeup, because any stray pigment on your cheekbone looks like a rash. Take a cotton swab dipped in micellar water and fix any smudges under the eye before you apply concealer. I do this every single time because fallout is inevitable. The extra sixty seconds makes you look like you got ready in a studio, not in a car at a red light.
Remember, you do not have to live in chocolate browns and champagne shimmers. A white base is just a tool, and tools are meant to be used. So next time you want to try a bold eye makeup idea, grab your white pencil first. Mess up, wipe it off, start again. That is honestly the whole trick.
Leave a Comment