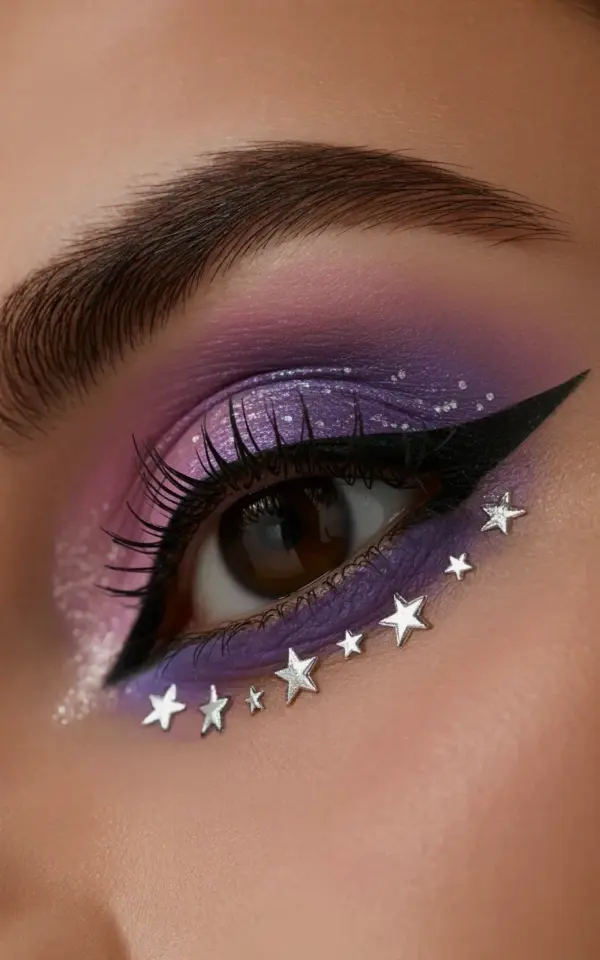
You can absolutely pull off this purple and pink glam look without dropping forty dollars at Sephora, and honestly, the results might surprise you. The whole thing hinges on a budget makeup look that blends a deep purple crease into a shimmering pink inner corner, all finished with tiny star rhinestones along the lash line. I have recreated this exact style on myself using nothing but drugstore shadows and a tube of lash glue, so trust me when I say the price tag of your products has zero correlation with how celestial this ends up looking.
Before we dive into the specific steps, let’s talk about the vibe. The photo shows a dramatic gradient that goes from a dark, almost moody purple base into a light, reflective pink at the inner corner. It is bold, it is sparkly, and it has that playful edge that rhinestones bring to the table. Save this for a night out, a concert, or literally any occasion where you want people to notice your eyes from across the room.
Building the Base with Drugstore Purple Eyeshadow
You need a solid transition shade to start, and look, you don’t need a fancy blending brush to make this work. A fluffy crease brush from any drugstore brand will do the heavy lifting. I used a matte deep purple to define the crease, packing the color right into the socket bone and sweeping it back and forth in tiny windshield wiper motions.
Here is where a common mistake happens: people try to apply a dark color directly to a bare lid and then wonder why it looks patchy. You need a primer, or at the very least, a dab of concealer set with powder. This gives the purple something to grip onto and prevents it from sinking into fine lines. The key is to build the intensity slowly, tapping more shadow on the outer third of the eye to create that sultry depth that anchors the whole look.
Creating the Shimmering Pink Inner Corner Effect
The transition from purple to pink is not a hard line, it is a gradual melt. I took a shimmering pink shadow and pressed it directly onto the inner corner using my ring finger, which deposits more pigment than any brush ever could. The reflective quality of the pink catches the light and visually pulls the eye open, making you look more awake even if you got zero sleep the night before.
To blend the two colors together so they don’t just sit there as two separate blobs, use a clean fluffy brush and gently swirl it right where the shades meet. You want a soft gradient that moves from deep violet on the outer lid to a soft rose gold on the inner half. This is the core of the budget eyeshadow look, and it creates that dimensional effect that looks way more expensive than it actually is.
Applying Star Rhinestones Along the Lash Line
Now for the fun part: the stars. The photo shows small silver star rhinestones arranged in a curved pattern along the lash line, and they decrease in size as they extend outward. That specific detail matters, because if all the stars are the same size, it looks like a sticker sheet mess, not a curated design.
You have a few options for application. I prefer individual rhinestones applied with a pair of tweezers, but you can also buy pre-made lash strips that come with stars attached if you want a shortcut. Here is a quick list of what works best for placement:
- Use a small dot of eyelash glue on the back of your hand and dip each star into it, letting it get tacky for thirty seconds before placing.
- Start with the biggest star near the center of the eye, right on the lash line, and then add smaller ones as you move toward the outer edge.
- Press each rhinestone down with the flat end of the tweezers to make sure it actually sticks to your lid and doesn’t fall off halfway through dinner.
I once spent ten minutes placing stars perfectly and then lost one while getting into my car. So, tip from personal experience: bring a few extras in your bag for touch-ups.
Drawing the Winged Liner to Tie It All Together
The winged liner is your anchor. Without it, the look might feel too soft, but with it, you get that sharp, feline elegance that balances out the sparkle. You want a liquid liner with a precise tip, a brush tip works best for dragging that fine line outward, but a felt tip is easier if you are in a hurry.
Draw the wing first. I start by sketching a line that angles upward toward the end of my brow, and then I connect it back to the lash line to fill in the triangle. The photo shows the liner extending beyond the lash line quite dramatically, so do not be shy with the length. Keep the line thin on the inner half and let it thicken as it reaches the outer corner.
One thing to note: the stars sit on top of or right alongside the liner, so you need to do your eyeliner before you place the rhinestones. Otherwise, you will be drawing lines over the glitter, which ruins the adhesive and makes a sticky mess.
Completing the Look with Groomed Brows
The eyebrows in the photo are well-groomed and dark, which might seem like a minor detail, but it actually grounds the entire makeup look. When you have a soft wash of purple and pink on the lid and a flashy liner, the eyes appear brighter when framed by a defined brow. You don’t need a complicated brow routine, just fill in any sparse areas with a pencil that matches your hair color.
Set the rest of your face with a dewy misting spray. This helps the shimmering shadows and the rhinestones stay put while also taking down any powderiness from the blending process. If you want to make your lashes pop, apply a heavy coat of volumizing mascara to the top lashes, but skip the bottom lashes entirely. The photo shows a clean bottom lash line, which keeps all the focus on the stars and the liner up top.
This is honestly the kind of eye makeup that works for hooded eyes too, you just need to place the purple crease slightly higher than your natural socket line so it stays visible when your eyes are open.
Budget Friendly Product Swaps and Shortcuts
You do not need a ten-pan palette from a luxury brand to get this kind of pigment. Look for budget makeup 2024 releases from brands like ColourPop, Milani, or Wet n Wild, their shimmer formulas are incredibly dense and metallic. A palette with a dark purple and a light pink is all you really need, the rest is just technique.
For the rhinestones, check the nail art section of your local drugstore. Nail art stars are usually cheaper than beauty-brand rhinestones, and they come in a pack of like a hundred for two dollars. They behave the exact same way on the eyelid, and you will have tons of leftovers for future experiments.
Here are a few practical shortcuts to make the process faster:
- Press the pink shadow onto the center of the lid before you blend the purple, this creates a softer transition.
- If you do not have star rhinestones, regular dotting tools and white eyeliner can fake the effect, but honestly, the real stars are worth the two dollars.
- Use a pointed cotton swab dipped in micellar water to clean up any liner mistakes around the wing, it is way easier than starting over.
The purple eyeshadow look only takes about fifteen minutes once you get the hang of it, and the payoff is massive for your makeup mindset.
Adapting the Look for Different Skin Tones and Occasions
This color story is pretty forgiving. Deeper skin tones can carry an even darker purple, think along the lines of blackberry or eggplant, while fair skin looks stunning with a lavender-leaning purple and a baby pink shimmer. The key is to let the inner corner highlight be the brightest part of the eye, that effect is universal and always reads as fresh.
If you want to wear this to a daytime event, skip the heaviest liner and just do a tightline instead. Still place the stars, but maybe limit them to two or three on the outer corner. For a going-out look, you want the full wing and the full spread of stars following that curved arc down the lash line.
I have worn this with a simple nude lip and also with a berry gloss, and honestly, the nude lip looks more editorial, while the gloss is better for date night. Pair it with a highlighter on the cheekbones and you are ready to photograph without any filters needed.
Ok so, the one thing I will say is to check your star placement in natural light before you leave the house. Indoor lighting can be deceptive, and you might find that your stars look crooked in the mirror by your front door. Arrange them slowly, and give the glue the full time it needs to dry, it is not the kind of step you want to rush.
Make beauty fun again with this sparkly, budget-friendly look that turns your eyes into a small galaxy. Gather your best drugstore eye shadows, grab a pack of star glitter, and give yourself thirty minutes to play around with the placement. I promise the results are worth it, and you will feel like a million bucks while spending about twelve.
Leave a Comment