Why Your Dewy Glow Ends Up Looking Greasy (And How to Fix It)
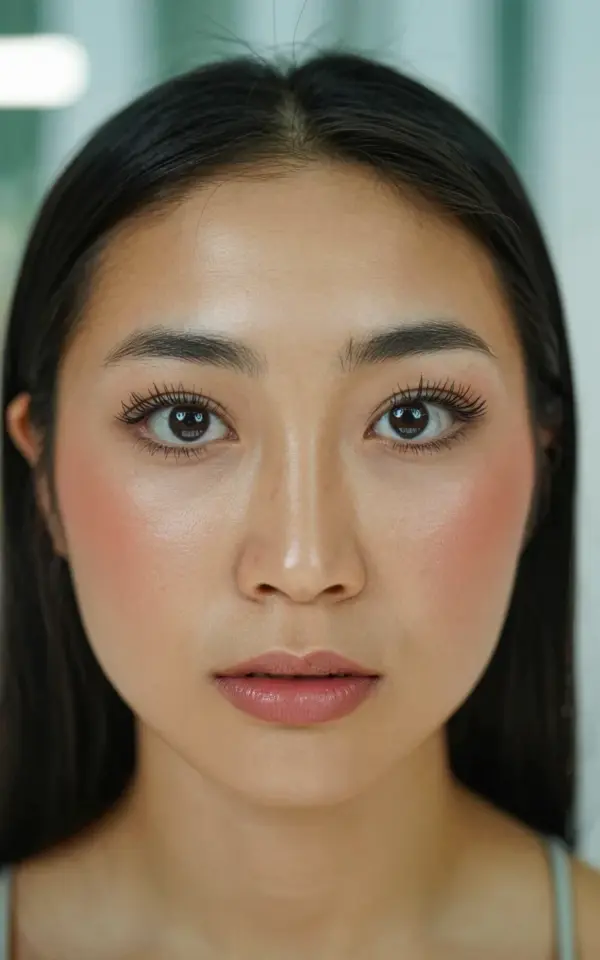
We have all been there. You want that fresh, dewy glowing skin you see in photos like the close-up beauty portrait of a young Asian woman with long black hair, soft pink blush and a natural mauve lip. But when you try it at home, your face looks shiny instead of luminous. The secret is not just in the products you use. It is in the mistakes you avoid. This natural makeup tutorial focuses on the most common slip-ups and shows you how to get a fresh, dewy finish without looking oily. I will walk you through each step, from skin prep to that final touch of muted mauve lipstick. By the end, you will have an everyday makeup look that feels as good as it looks.
Mistake 1: Skipping Skin Prep for the Glow (Dewy Skin Makeup Starts Here)
If you think moisturizer is optional for a dewy Skin Makeup look, you are wrong. The biggest mistake I see is people applying foundation directly over bare skin or just a thin layer of matte primer. Dewy skin comes from the inside out. You need a hydrated base. That means using a hydrating serum, a rich moisturizer, and a luminous primer. In the photo I am referencing, the skin has a smooth, dewy texture with a warm undertone. That does not happen by accident.
Here is the fix: Start with clean, damp skin. Apply a hyaluronic acid serum while your face is still wet. Then lock it in with a lightweight gel moisturizer. Wait two minutes. Apply a sheer, glowing primer. Do not use silicone-heavy primers that sit on top of the skin. They create a barrier that prevents the rest of your makeup from blending naturally. The goal is to make your skin look plump and bouncy, not slick.
Mistake 2: Applying Too Much Foundation (How to Get a Light Layer for an Everyday Makeup Look)
I used to think more foundation meant more coverage. But for an everyday makeup look, that is the fastest way to kill your dew. Heavy foundation masks the natural texture of your skin. It looks flat and cakey, especially around the nose and chin. In the portrait referenced, the skin looks smooth but not mask-like. The foundation is nearly invisible. That is the effect we want.
Instead of pumping out a full dose, use a small amount of a lightweight, skin-tint style foundation. Warm it between your fingers and press it into the center of your face. Blend outward. Leave the edges of your face nearly bare. This creates a natural fade. If you need more coverage, only add it to areas like redness around the nose or dark spots. A damp beauty sponge helps to keep the finish sheer and dewy. Avoid matte, full-coverage foundations if you are aiming for a healthy glow.
Mistake 3: Over-Defining Your Brows (Keep Them Natural for This Natural Makeup Tutorial)
Bold, blocky brows have their place. But in this natural makeup tutorial, they will distract from the soft, fresh vibe you are creating. I notice many people outline their brows too sharply or fill them in with a dark, heavy powder. The result looks harsh against soft pink blush and mauve lips. In the photo, the subject has defined eyebrows, but they are not overpowering. They frame the eyes without screaming for attention.
The solution is simple. Use a brow gel with a bit of tint. Brush your brows upward and outward. Only fill in sparse areas with light, hairlike strokes using a fine-tipped pencil. Choose a shade that is one step lighter than your natural brow color. When you over-fill, you lose the natural dimension. Set with a clear gel to keep them in place. You want your brows to say hello, not yell.
Mistake 4: Overcomplicating the Eyes (Defined Lashes and Mascara Are Enough)
It is tempting to reach for eyeshadow palettes and eyeliner when you want a polished look. But for everyday wear, that extra layer can ruin the effortless dewy effect. The subject in the image has striking brown eyes enhanced with long dark eyelashes and defined eyelids that are mostly bare. There is no heavy shadow or winged liner. The simplicity is what makes the look work.
Stick to the basics. Curl your lashes well. Apply two thin coats of a lengthening mascara (not a volumizing one that clumps). Wiggle the wand at the roots, then pull through. If you want a bit of definition, use a soft brown or taupe powder eyeshadow brushed lightly along the crease. That is it. Skip the eyeliner. The focus should be on your skin and lips. Your eyes will naturally pop because the rest of your face is balanced.
Mistake 5: Applying Blush Wrong (Placement and Shade for Soft Pink Blush)
Blush can either lift your face or drag it down. I see too many people placing blush too close to the nose or too low on the cheeks. That makes the face look tired or red rather than fresh. The portrait shows soft pink blush sitting high on the apples of the cheeks, blending upward toward the temples. That placement creates a youthful, flushed glow. The shade is a true soft pink, not a coral or a berry. It matches the warm undertone of the skin.
For best results, use a cream blush. Cream formulas give a natural, dewy finish that powders cannot match. Dot two small dots on each cheekbone and blend with your fingers or a damp sponge. The color should be diffused and light. If you prefer powder, use a fluffy brush and tap off the excess. Build slowly. Remember, you can always add more, but removing too much blush is a headache. The goal is a “just walked in from a brisk walk” look, not a clown flush.
Mistake 6: Choosing the Wrong Lip Shade (How to Do Mauve Lips Right)
Mauve is a tricky color. It can look chic and muted, or it can wash you out completely. Many people pick a mauve that is too gray or too dark, and it makes the rest of the makeup look muddy. In the photo, the lips are painted in a natural mauve shade with a soft satin finish. It is not matte, not glossy. Just right. The key is to match the undertone to your skin. For warm skin tones, look for a mauve with a hint of peach or rose. For cool tones, go for a slightly dusty mauve.
To apply, exfoliate your lips first with a gentle lip scrub. Apply a thin layer of balm. Blot it off. Line your lips with a nude pencil that matches your natural lip color (not the lipstick). Then fill in with your mauve lipstick. Blot with a tissue, then apply one more thin layer. This gives a stain-like effect that lasts without fading unevenly. Avoid layering too much product. You want the lip to look like your lips, only better.
Mistake 7: Over-Powdering and Killing the Dew (The Setting Trap)
I understand the fear of sliding makeup. But if you powder your whole face, you lose the dewy effect you worked so hard to build. The subject in the photo has a gentle glow on the skin, not a matte finish. The lighting is soft and even, creating that natural sheen. You can get the same effect by only powdering the areas where your face naturally gets oily: your T-zone (forehead, nose, chin).
Use a translucent, finely milled powder. Dip a small fluffy brush, tap off the excess, and press it into the oily zones. Do not sweep. Pressing keeps the powdery layer thin. For the rest of your face, let the natural oils show through. If you need a bit of set, use a hydrating setting spray. It will melt the powders into your skin and refresh the dew. Avoid setting sprays with a matte finish. Look for one labeled “dewy” or “glow.” That final spritz brings the whole look together.
Your Turn to Try This Natural Makeup Tutorial
Achieving dewy glowing skin is not about expensive products. It is about avoiding the small mistakes that trip us up. Start with skin prep. Go light on foundation. Keep the eyes simple with just defined brows and mascara. Place that soft pink blush high on the cheeks. Finish with a muted mauve lipstick. Each step matters. I hope this helps you recreate the look from that beautiful close-up photo. If you try it, share your results. I would love to hear which mistake you tend to make most often. Happy glowing.
#naturalmakeuptutorial #dewySkinMakeup #everydayMakeupLook #mauveLips #softPinkBlush
Leave a Comment