Why I skip foundation in spring (and you should too)
This everyday spring makeup routine started because I got tired of foundation sliding off my face by 10 a.m. Honestly, once the weather warms up, my skin feels suffocated under a full base. I’d rather have a slightly uneven tone than a cakey mess. And here’s the thing: most people won’t notice your pores if you let them breathe a little. So I skip the foundation entirely. I just focus on one or two spots that actually need coverage. That’s the whole philosophy behind a fresh face – less product, more skin, way less stress.
Look, I’m not saying foundation is evil. But for spring mornings when you’re already running late? It’s a time suck. You have to blend, set, and pray it doesn’t melt. No thanks. I’d rather spend those extra two minutes sipping coffee and picking out earrings.
The only concealer trick you need for a natural finish
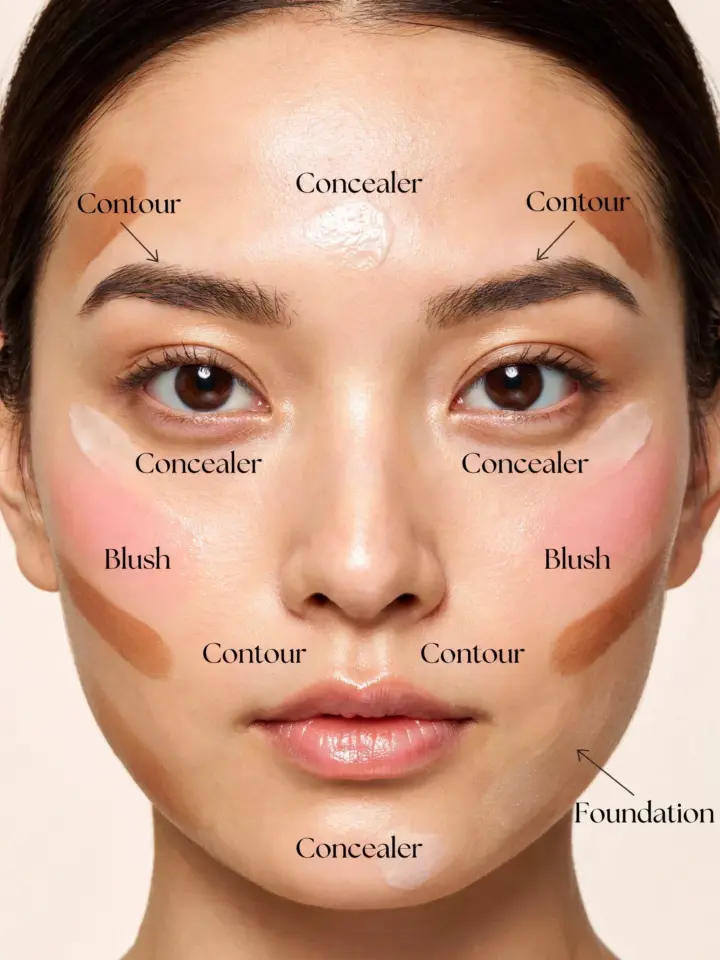
Ok so I don’t use concealer under my whole eye. That’s a rookie move. Instead, I dab a tiny dot on the inner corner of my dark circle and another on any red or blemish. Then I blend with my ring finger – not a sponge, not a brush. Fingers warm the product and make it look like your own skin, just slightly better.
- Step one: Apply a rice-grain-sized amount of concealer (I use a shade that matches my skin, not lighter) to any area that needs it.
- Step two: Pat, don’t rub. Rubbing moves the product and makes it look patchy.
- Step three: If you have a stubborn spot, let the concealer sit for thirty seconds before blending. Magic, I swear.
- Step four: Walk away. Do not keep adding more concealer. That way lies madness. (And a weirdly heavy face.)
I learned this trick from a makeup artist who said “less is more” and then charged me $200 for the advice. Worth it, honestly. Anyway, this step takes about one minute.
My current cream blush obsession (and why it’s not just for cheeks)
I used to be a powder blush person. But spring humidity turned my cheeks into a stripey mess. Cream blush is the answer. It melts into skin and gives that “just went for a jog” flush. But here’s a weird little aside: I also swipe a tiny bit onto my eyelids and the bridge of my nose. It ties the whole look together without extra products. Not gonna lie, I look like I spent effort when I really just smeared one thing in three places.
My current favorite is a peachy-pink stick. One swipe on each cheek, then blend with fingers. Yes, I have cream blush on my fingers. I wipe them on my jeans. It’s fine. The whole process takes thirty seconds. For the nose, I use the residual product left on my fingertips – no need to dip back in.
Pro tip: if you’re worried about looking like a clown, start with a small dot. You can always add more. You cannot subtract. Unless you have a makeup wipe handy, but who carries those? Not me.
A tinted lip balm that doubles as lip and cheek (if you’re lazy like me)
Let’s be real: I don’t have time to coordinate a separate lipstick and blush. So I use a tinted lip balm for my lips and sometimes, if I’m feeling wild, I tap a bit on my cheeks for extra color. The trick is to choose a balm that’s sheer but buildable. A bright pink will look insane on cheeks unless you blend fast. I go for a soft rose or a muted berry. That way, even if I mess up, it still looks natural.
One of my favorite things about this routine is that I can apply the balm without a mirror. On a train, in the car at a red light (don’t tell anyone), while holding a coffee – it doesn’t matter. It’s forgiving. And it keeps my lips from feeling crispy by lunchtime. Spring winds are brutal, by the way.
How to make a 5-minute spring face last until evening
I know what you’re thinking: “But won’t everything slide off by noon?” Here’s the secret: I don’t care if it fades a little. Natural makeup looks better when it’s a bit lived-in. That said, a couple of things help. First, I spray a setting mist (just a cheap one from the drugstore) after I’m done. It takes ten seconds. Second, I blot my T-zone with a tissue around lunchtime. No powder, no touching up the blush. Just a quick press.
The real game-changer? I apply my concealer in very thin layers. If I use too much, it creases. And creasing is the enemy of fresh. So I literally use a barely-there amount. Then I set it with a tiny puff of translucent powder under my eyes – only under the eyes, nowhere else. My forehead stays shiny. That’s okay. Shiny looks dewy in spring lighting.
Tools vs. fingers: a brutally honest take
Look, I own a drawer full of makeup brushes. Some are expensive. Most are collecting dust. For this routine, I use my hands almost exclusively. Fingers give better control and less waste. The only exception is the powder under my eyes – I use a tiny fluffy brush for that. But you could also use a clean finger and a loose powder. I did that once in a hotel room. It worked fine.
Now, if you hate getting makeup on your hands (my sister does – she keeps a pack of wet wipes nearby), you can use a damp beauty sponge for the concealer. But honestly, a sponge sucks up so much product. It feels wasteful. Plus, washing sponges is a chore I refuse to do. So fingers win. They’re always clean, always warm, and always free.
Why this routine works in spring (and not in winter)
Winter skin is dry, flaky, and demands more coverage. But in spring, the air is moist. Your skin actually behaves. Plus, you’re likely to be outside more – walking, biking, brunching. Who wants to worry about foundation settling into laugh lines during an outdoor brunch? Not me. This routine is designed for movement. It moves with you. It fades gracefully instead of cracking.
Also, spring is when my freckles come out (if I’m lucky and get some sun). I don’t want to cover those. A light routine lets them peek through. It sounds cheesy, but I like looking like a human being with actual skin texture instead of a filter.
Final thoughts: just try it once, seriously
I promise, you will not miss foundation. You’ll save time, money, and the anxiety of checking your makeup in every mirror. This everyday spring makeup routine takes five minutes from start to finish. That includes the time lost to digging through your bag for that lip balm. Try it tomorrow when you’re rushing out the door. Then tell me if your face doesn’t feel lighter. I bet it will.
Want more simple routines like this? Follow me on Pinterest for spring beauty ideas that don’t overcomplicate your morning. Save this post to your fresh face board so you can find it later. And if you try this routine, let me know how it goes. I’m genuinely curious.
#everydaymakeup #springmakeup #naturalmakeup #quickmakeup #freshface
Leave a Comment