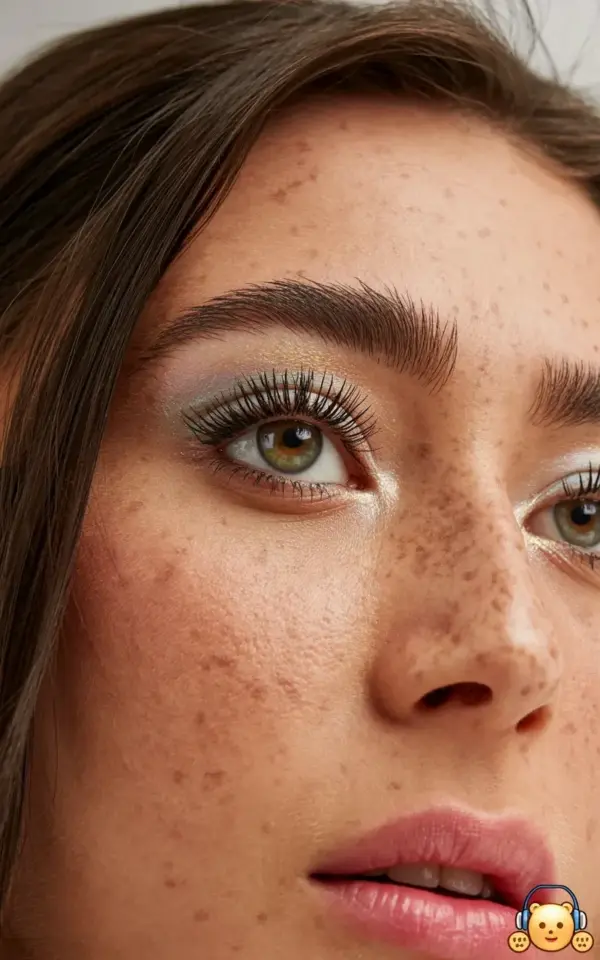
Honestly, I used to think a dewy glow and dramatic false lashes on brown eyes required a pro makeup artist and a hundred dollars worth of products. But after years of trial and error (and yes, some sticky, lash-glue disasters), I figured out a quick routine that works without wrecking your wallet. The secret? Lean into the natural warmth of your skin and choose affordable lashes that don’t look fake or cost a fortune. Ok so let me break it down, step by step, the way I actually do it.
Why Dewy Skin Makes Brown Eyes Pop
Brown eyes already have depth. That rich, warm tone catches light differently than lighter eyes, and the right base can make them look almost translucent. Here’s the thing: a matte, flat finish hides that effect. Dewy skin, on the other hand, reflects light, creating a soft halo around your face that draws attention straight to your eyes. Not gonna lie, I used to hate the greasy feeling of some highlighters. But a lightweight, dewy foundation or a tinted moisturizer with a bit of shimmer solves that. My go-to is the L’Oreal Lumi Glotion – it’s under $15 and gives that “just walked out of a humid spa” glow without looking oily.
And for brown eyes specifically, the warmth of dewy skin complements the brown iris. It’s like a color echo, but subtle. You don’t need highlighter on every high point. Just let your skin breathe. A damp sponge with a few drops of liquid illuminator mixed into your base works wonders.
Affordable False Lashes That Look Expensive
Look, you don’t need mink or handmade lashes from Japan to get that dramatic eye effect. Drugstore options have come a long way. I’m partial to Ardell’s Wispies line – they cost about $5 a pair and last me 8 to 10 wears if I clean them properly. For brown eyes, I reach for styles with a bit of a crisscross pattern, not too thick at the inner corner. The goal is to open the eye, not weigh it down.
But here’s a weird thing I learned: lash length matters more than volume when you have brown eyes. Long lashes frame the iris and create contrast. Short stubby ones get lost in the brown. So when you shop, look for “natural drama” on the box, not “dramatic volume.” Also, don’t ignore the lash band. A thin, flexible band is easier to apply and less likely to poke your inner corner. I once bought a super cheap pair that had a plastic band so stiff it looked like I was wearing a tiny fence. Never again.
- Ardell Wispies 110 (great for everyday drama)
- Kiss Lash Couture in “Boudoir” (slightly wispier, under $6)
- Eylure Luxe Silk for a softer, more feathery look (around $8)
The Shimmer Eyeshadow That Won’t Break the Bank
So in the photo, you can see a soft shimmer on my eyelids, something warm but not glittery. That’s the trick for brown eyes: avoid cool-toned silvers. Instead, go for champagne, soft gold, or a peach-bronze. A single pan of NYX’s “Girl Talk” is like $4 and does the job perfectly. Swipe it across the lid with your finger – finger gives more pigment than a brush, and you save time.
And you don’t need a complex crease shade. Honestly, a little shimmer on the inner corner and a wash on the lid is enough. Brown eyes already have dimension; adding too many shades can muddy the look. I keep it simple: one shimmer color on the lid, a tiny matte brown in the outer V if I feel like it, and a highlight under the brow bone. But look at the photo again – no heavy outer shadow. Just a soft glow that catches the light and lets the lashes do the heavy lifting. That’s the whole point.
How to Keep Your Base Fresh and Natural (Without Looking Cakey)
You know that moment when you apply full-coverage foundation and then realize you can’t see your freckles anymore? For me, that’s a tragedy. In the image, you can see subtle freckles peeking through. That’s not a filter, that’s a lightweight base. I use a tinted moisturizer (Maybelline’s Dream Fresh BB Cream is a solid cheap option, about $8) and spot-conceal only where I need it – under eyes, around the nose. A dewy setting spray, like the Milani Make It Dewy, locks everything in place without adding powder. Because powder kills the glow, right?
And here’s a little hyper-specific tip from personal experience: if you have dry patches around your nose, don’t exfoliate too hard. Instead, pat a drop of face oil onto those spots before applying your base. I use the Trader Joe’s jojoba oil because it costs next to nothing and doesn’t break me out. Anyway, that small step makes the foundation sit like skin instead of flaking off by noon.
Nude Pink Lip: The Perfect Balance to Dramatic Lashes
When your eyes are bold, your lips should do the opposite – sit back and look pretty without shouting. A nude pink with a slight sheen is the easiest way to finish the look. Not too brown (that can drain color from brown eyes), not too bright (that competes). I look for a shade like “Tulip” or “Rose Beige” in the drugstore. Revlon’s Super Lustrous Lipstick in “Primrose” is my top pick, about $8. It has just enough pink to warm your face without turning into a statement lip.
But honestly, you can also use a tinted lip balm. The Burts Bees tinted balm in “Rose” gives a similar effect and feels less fussy. Apply one layer, blot, then reapply a thin second coat. That keeps the color from sliding into lip lines. And yes, you can skip liner. Nobody’s zooming in on your lip line when your lashes look that good.
Quick Application Tips for a 5-Minute Natural Glam
Let’s be real: you don’t always have half an hour. So here’s my condensed routine that works for a night out where you still want to feel like you (just better). After skincare and that dewy base, I do:
- One sweep of shimmer shadow on the lid and inner corner.
- Tightline the upper waterline with a soft brown pencil (brown is softer than black for brown eyes and makes the lashes look fuller).
- Apply false lashes – I cut them in half and place only on the outer third for a lifted, cat-eye effect without the full strip drama. It’s faster and more forgiving.
- A swipe of the nude pink lip. Done.
And about the lashes themselves: always curl your natural lashes first, even if you’re using falsies. That helps them blend. And apply the lash glue on the band, wait 30 seconds for it to get tacky, then press onto your lash line from the middle outward. If you mess up, just use a spoolie to brush your natural lashes and falsies together. Quick fix, no tears.
I have one weird complaint about this routine: the glue smell. Some drugstore glues have that strong chemical odor. I switched to a latex-free clear glue from Beauty Creations, about $4, and it’s totally odorless. Small thing, but it makes the process more pleasant.
So that’s my over-explained, budget-friendly approach to a dewy glow and dramatic lashes for brown eyes. Try it out for your next night out, or even just a Tuesday when you want to feel a little extra. The whole thing costs less than a lunch out and takes maybe seven minutes max. Let me know how it goes in the comments – I genuinely want to hear if the Ardell Wispies work for you as well as they do for me. ✨
#dewyMakeup #FalseLashes #BrownEyes #MakeupTips #NaturalGlam
Leave a Comment