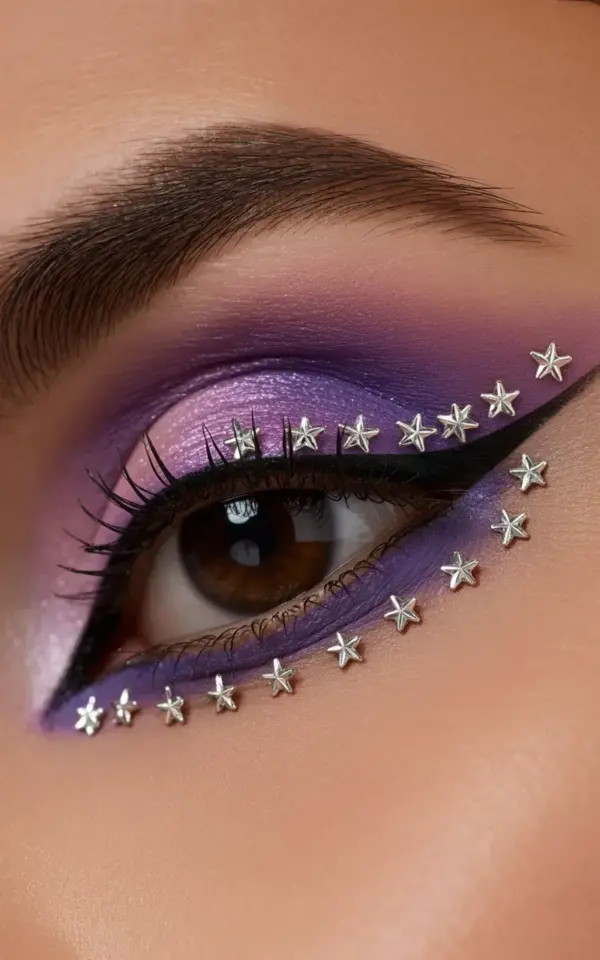
So you have a favorite going-out playlist, a top that makes you feel like the main character, and no idea what to do with your makeup. I’ve been there. This purple and pink gradient eyeshadow look is the kind of thing that seems like it requires a professional kit and a spare hour, but honestly, it’s achievable with a couple of brushes and a steady hand. The whole effect comes down to a simple deep purple base, a lighter pink inner corner, and those silver star rhinestones just sitting along the lash line like they were meant to be there. Let’s walk through it step by step, assuming you have never blended an eyeshadow in your life.
Why gradient eye makeup looks so intimidating (and why this one isn’t)
We’ve all stared at a photo and wondered how anyone gets a seamless shift from one color to another. Gradient eye makeup looks like the artist only uses smoke and mirrors. But here’s the thing, a gradient is just two colors meeting in the middle, and you are the one controlling where they meet.
This specific version is forgiving because the colors are related. Purple and pink sit next to each other on the color wheel, so even if your blending comes out a little messy, the transition still looks intentional. No sharp lines, no harsh geometry, just one color melting into the next. It’s similar to painting a wall, the prep work matters, but the actual technique is pretty basic.
The full product list: plus the one you already have
Before we get into the tutorial, let’s talk tools. A few specific products will make your life easier, but don’t feel like you need to buy a whole new collection. Here is what you actually need:
- A matte or shimmer deep purple eyeshadow. Something with good pigment, not a dusty pale lavender.
- A light pink eyeshadow. A satin or shimmer finish works best for that soft glow in the inner corner.
- Small silver star rhinestones. These usually come in a pack with different sizes. Go for the ones with a flat back.
- Eyelash glue. The kind with a brush applicator is way easier to control than a tube you have to squeeze.
- A fluffy blending brush and a flat packing brush. The fluffier one is for the purple, the flat one is for the pink.
And here is the thing, you probably already have tweezers. Even if you don’t do your brows, you have tweezers lying around somewhere. You will need them to place the rhinestones; using your fingers is a recipe for them sticking to your skin instead of your lid. It’s one of those annoying little makeup truths that never makes it into the pretty picture captions.
A beginner friendly step by step for the purple and pink gradient
First, take your deep purple eyeshadow and tap off the excess from your brush. Seriously, tap it twice. Start applying it at the outer half of your eye, right in the crease, and buff it back and forth. The key is to keep the most intense color at the outer corner and let it fade as it moves inward.
You don’t need a ton of product. Build the purple up gradually until you are happy with the depth. Now, switch to your flat brush, dip it into that light pink, and press it right into the inner corner of your eye. This is where the magic happens. The pink should cover the area where the purple started to fade, and you will see them merge.
Here is a weird trick for anyone who is scared of blending. Use a clean, fluffy brush and make tiny little circles right in the middle where the two colors meet. Don’t swipe, just circle, like you are erasing a pencil mark. This creates that smooth 2000s rockstar glam transition instead of a stark line.
How to place the star rhinestones along the lash line without losing your mind
The rhinestones are what make this look feel special, but applying them can turn into a test of patience if you do it wrong. Wait until your eyeshadow is completely set before you bring out the glue. Pressing glitter onto a wet or tacky base just creates a muddy mess, which is the opposite of the clean silver sparkle we want.
Take your tweezers and gently pick up one star at a time. Dip the back of the star into a tiny dot of lash glue, just the smallest smear, and place it on your lower lash line. The photo here shows them in a curved pattern, starting with a bigger star near the inner part of the eye and graduating down to smaller stars as they stretch outward.
A lot of tutorials tell you to press down for ten seconds. I say five is enough. If you press too hard, you’ll smudge the shadow right next to it. Give the glue a couple of minutes to dry and get tacky before you open your eye fully.
Build the winged liner over that shadow without making a mess
Winged liner is a whole personality on its own. It can be a sharp, dramatic flick or a subtle little lift, and this purple and pink gradient eyeshadow look works with either. The important part is doing the liner after the rhinestones have been placed. That way, the black line can sit neatly against the lashes and cover up any where the glue might have dried a little shiny.
My advice is to draw the line in two parts. Start with a thin line from the middle of your lash line to the outer corner, and then extend it upward to create the wing. Don’t try to paint a single continuous stroke from your inner corner all the way out. That’s a lie Hollywood tells you. It works for some people, but for the rest of us, two short strokes are way easier to control.
Now, this is where the specific visual of the photo matters. The black liner in this image extends beyond the lash line with a gorgeous wing, and the purple shadow surrounds it. You want the liner to have a sharp edge, so use a brush with a fine tip and keep a cotton swab dipped in makeup remover nearby for any wobbles.
My personal tip for keeping the shimmer in place and your cool-girl vibe intact
You can use the most expensive eyeshadow and still end up with glitter falling down your cheeks an hour later. It happens to me all the time, but I am a bit of a glitter hoarder, so I have accepted the situation. For this look, you want to minimize that drifting sparkle as much as possible.
Skip a heavy primer if you have one, and instead, use a tiny bit of eyeshadow base or even concealer on your lid before you start. This gives the purple and pink something to latch onto. Once you are done, a quick spritz of setting spray does wonders for keeping the stars on your face and not on your chin.
Nobody wants to spend twenty minutes picking rhinestones off their cheek with a pair of damp fingers. Any simple spray will do. Hold the bottle about eight inches away from your face and mist it gently. Let it dry naturally, and resist the urge to fan yourself with your hand.
How to adapt this look for hooded eyes or a lazy Sunday
The technique works beautifully on all eye shapes, but you might have to move the gradient up higher if your lid space is limited. If you have hooded eyes, skip the shimmer on the center of the lid and put the light pink a touch higher, just under your brow bone. That little change makes the crease look like it goes deeper than it does.
Maybe you don’t want the full rhinestone display. Honestly, you can do just the gradient and the winged liner, and it still looks amazing for a dinner date or a Friday at work. The stars are the loudest part of this look, so leaving them off makes it a much more casual thing.
I also have to mention those perfectly arched brows in the photo. They are strong and dark, and they frame the whole eye. If your brows are a little wild, just brush them upward and set them with a clear gel. Don’t get too complicated. No one who is wearing this many stars on their eyelids needs to stress over a few stray brow hairs.
Let’s wrap this up
The whole point of this look is that it looks like a lot but isn’t. Start with a deep purple on the outer half, blend in a soft pink from the inner corner, stick on some silver stars, and finish with a winged line. It’s a statement, sure, but it’s also just colored powder and some glue. You’ve got this.
If you try this for your next makeup night, tag me in the photo. I want to see the stars and the liner and that pretty gradient in the middle. And if you have a trick for keeping rhinestones on your lower lash line, please share, because I honestly need all the help I can get.
Leave a Comment