Why Brown and Bronze is the Perfect Smokey Eye for Beginners
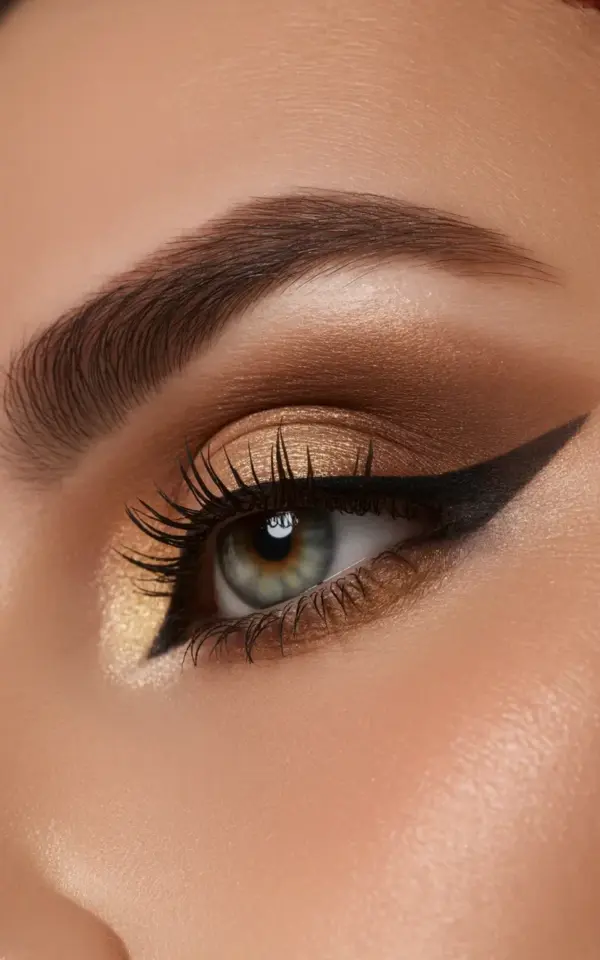
The brown and bronze smokey eye is the kind of look that feels glamorous without being intimidating. If you have ever wanted to try a dramatic eye but worried about harsh lines or messy blending, this palette is your friend. Chocolate brown, warm bronze and a pop of gold shimmer work together seamlessly because they are all from the same color family. The photo for this tutorial shows exactly that: a deep chocolate shadow in the outer corner melting into a warm bronze across the lid, with a soft golden highlight right in the center. The groomed brows and dramatic lashes tie everything together in just a few minutes.
For beginners, this combination is almost foolproof. Dark brown is more forgiving than black, and bronze adds warmth that suits nearly every skin tone. You do not need any special skills. Just a few basic brushes and a little patience.
What You Will Need for This Look
Before you start, gather a short list of products. You probably already own most of them. The key is to have one matte dark brown shadow, one warm bronze shadow (matte or shimmer works), and one gold shimmer shadow for the center of the lid. You will also need a fluffy blending brush, a flat shader brush, and a small pencil brush for detail work.
- An eyeshadow primer or a concealer (helps colors stay put and blend smoothly).
- A matte dark chocolate brown shadow (no glitter, just pigment).
- A warm bronze shadow (look for a tone with a bit of red or orange undertone).
- A gold shimmer shadow (finely milled, not chunky).
- A black or dark brown eyeliner (pencil or gel).
- A volumizing mascara or false lashes (the photo shows long, dramatic lashes).
- A brow gel or pomade in a shade close to your natural brow color.
- Three brushes: fluffy blending, flat shader, small pencil.
That is it. You do not need a 20-piece brush set or a dozen shadows. This tutorial is designed for minimal supplies.
Step 1: Prep Your Eyes and Brows
Start with a clean and moisturized eye area. Apply a thin layer of eyeshadow primer all over your lid, from lash line to brow bone. Let it sit for about 30 seconds until it becomes tacky. This step is non-negotiable if you want the colors to blend without turning muddy.
Now groom your brows. The photo shows perfectly shaped brows with a natural arch, filled with a dark brown product. Take a brow gel or a brow pencil and lightly fill in any sparse areas. Brush the hairs upward and outward with a spoolie. You do not need a sharp Instagram brow; just define your natural shape. Clean brows frame the smokey eye and make the whole look feel finished.
Step 2: Build the Brown and Bronze Gradient
This is where the magic happens. Pick up your fluffy blending brush and tap it into the matte dark chocolate brown shadow. Tap off any excess on the back of your hand. Start at the outer corner of your eye, placing the color in a small V shape. Then use small circular motions to blend the color inward along the crease. Do not drag the brush back and forth; use tiny circles. This prevents harsh lines.
Next, switch to the flat shader brush and press the warm bronze shadow onto the center of your lid. Gently blend the bronze into the dark brown where they meet. The goal is a soft gradient, not a sharp line. If you see a harsh edge, use the fluffy brush (still with a tiny bit of dark brown on it) to soften the border. The photo shows the bronze tone spreading across the lid, so keep it concentrated in the middle and let it fade toward the inner corner.
Finally, take the gold shimmer shadow on a clean finger or a damp flat brush. Pat it directly onto the center of your lid, right over the bronze. This creates a bright focal point. Do not rub; just press and gently tap to blend the edges. The shimmer catches light and makes the eye look wider and more awake.
Step 3: Line and Define for Drama
Now add definition along the lash line. The photo shows dramatic black lashes, so the liner can be subtle or bold depending on your comfort. For beginners, a dark brown or black pencil liner is easiest. Gently tightline your upper waterline (the rim just above your lashes) by wiggling the pencil back and forth. This makes your lashes look thicker without a visible line.
If you want a more dramatic effect, draw a thin line along the upper lash line and smudge it slightly with a small pencil brush. Keep the line close to the lashes and slightly thicker at the outer corner. Do not wing it out unless you feel confident. A straight, smudged line works perfectly with the smokey eye because it blends into the dark brown shadow. The lower lash line can get a bit of the dark chocolate shadow smudged halfway in from the outer corner, using the small pencil brush.
Step 4: Finish with Lashes and Highlight
Mascara is the easiest way to complete the look. Apply two coats of a volumizing black mascara to your upper and lower lashes. Wiggle the wand at the roots and pull upward. If you want the drama shown in the photo, consider adding a pair of half lashes or individual falsies. But honestly, a good mascara with a plastic wand can give you plenty of length and curl without the glue.
Do not forget the inner corner and brow bone highlight. Use the same gold shimmer shadow on a tiny brush to tap a dot at the inner corner of your eye. Then sweep a tiny amount just under the arch of your brow. This lifts the whole eye area and makes the smokey eye look intentional rather than heavy. The photo does not show a strong brow bone highlight, but a soft touch adds polish.
Common Mistakes Beginners Make (and How to Fix Them)
Even with a foolproof palette, a few things can go wrong. Here are the most common pitfalls and simple fixes.
- Muddy blending: This happens when you use too much shadow at once or mix colors with a dirty brush. Fix it by tapping off excess powder and cleaning your blending brush between colors.
- Fallout under the eyes: Shimmer shadows often shed glitter. Apply your face makeup after the eyes, or hold a tissue under your eye while you pat on the gold shimmer. You can also do eyes first and clean up fallout with a damp cotton swab.
- Too much shimmer everywhere: The photo uses shimmer only in the center of the lid. Keep matte shadows on the outer corner and in the crease. Too much shimmer makes the eye look greasy rather than glowy.
- Brows too heavy: If you overfill your brows, the whole look becomes heavy. Use light, short strokes and brush through with a spoolie to soften.
These fixes are small but make a big difference in the final result.
Conclusion: Make This Look Your Own
The brown and bronze smokey eye is a classic that you can wear for a night out, a special event, or even a casual day when you want to feel a little extra. Once you master the gradient and the blending, you can swap the bronze for a rose gold or the dark brown for a charcoal. The technique stays the same. Save this pin for your next makeup routine, and do not be afraid to practice on a lazy afternoon. You will nail it in no time.
#smokeyeye #bronzemakeup #eyeshadowtutorial #brownsmokeyeye #makeupforbeginners
Leave a Comment