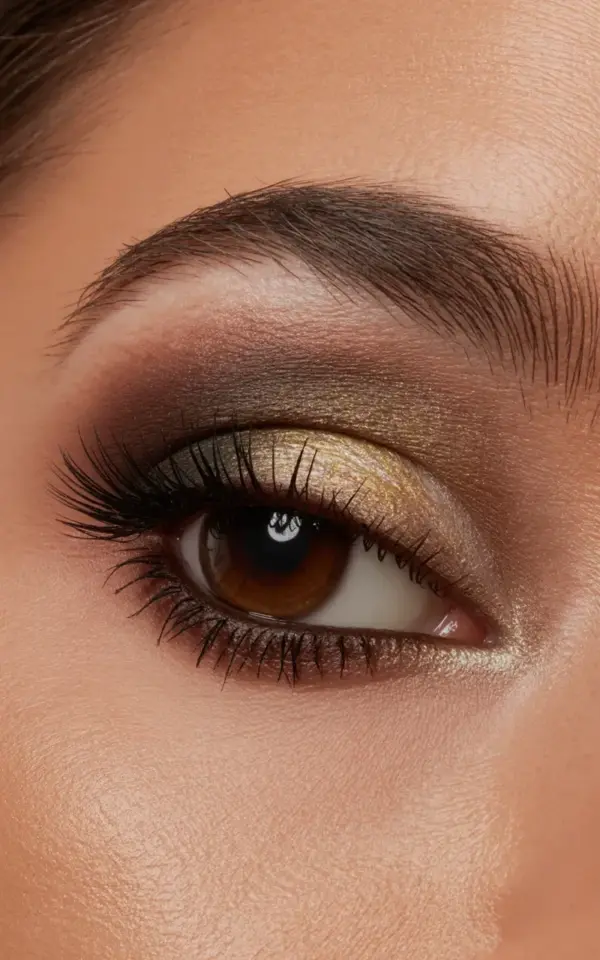
You know that moment when you try a brown smokey eye and it ends up looking like a dark smudge? I’ve been there too many times. The problem isn’t your eyeshadow quality or your brush – it’s a simple step you’re skipping. The number one brown smokey eye mistake is skipping the transition shade. Without it, that deep chocolate you packed into the outer corner just sits there, harsh and unblended. But here’s the thing: once you add a warm brown crease shade first, everything changes. Suddenly the dark melts into something sultry rather than sloppy. I want to show you exactly how to fix this with a seamless blend that turns your look from “what happened” to “wow.”
Why the Transition Shade Matters (And What It Actually Does)
Look, everyone talks about blending, but they rarely explain what the transition shade is doing. It’s not just extra color. It’s the bridge between your skin tone and that deep, dramatic shadow. Think of it as a soft, faded middle ground. Without it, the contrast is too sharp. The dark pigment hits your lid and stops abruptly.
I used to think I could just blend the dark shadow outward more. But that only dragged the dark into the crease unevenly. The warmth of a true transition shade – something peachy or golden brown – softens the whole thing. It creates an illusion of depth without a hard line. Honestly, it’s the difference between a professional finish and a makeup accident.
Here’s a weird aside: I once tried using a taupe shade as a transition thinking “close enough.” Looked like a bruise. Not gonna lie, I had to wipe it all off and start over. That’s when I learned that warm browns are non-negotiable for this palette. So yes, pick a warm brown, not a cool gray.
Step 1: Choose Your Warm Brown Base (The Bronzetones Secret)
Ok so for that photo inspiration – the one with the dramatic brown and bronze shimmer – the key is starting with a bronzy warm brown as your transition. A shade that’s a touch darker than your natural skin but lighter than your eventual deep cocoa. I reach for a matte bronzer shade or a single soft brown like MAC Soft Brown or ColourPop’s Take It Easy. Something with a hint of orange or gold undertone.
Apply it with a fluffy crease brush. Sweep it into the socket of your eye in windshield wiper motions. Don’t press hard. Keep it light and airy. This step doesn’t need to be perfect. In fact, a little messiness here helps the later blend. The goal is to define the crease shape and leave a soft wash of color.
This is where the bronzetones magic starts. The warmth in that base shade will play beautifully with the chocolate and shimmer later. Not too orange, not too red. Just a nice baked-in warmth that makes the whole look feel cohesive.
Step 2: Layering Deep Chocolate for Depth (Without the Harshness)
Now for the dark stuff. You’ve got your transition shade down. Let it sit for a moment – not literally, but don’t rush straight to the deep brown. I like to blend the transition a second time with a clean brush to diffuse it even more. Then I pick up a deep chocolate matte shade on a smaller, denser blending brush.
Tap off the excess. Please. This is the step where people load up the brush and then slap it on the outer corner. You do not need that much pigment. Instead, place the color right at the outer V of your eye – where the crease meets the outer lash line. Pat, don’t swipe. Then blend it inward using tiny circular motions.
If you see any sudden stripe of dark, go back to the warm transition shade on a clean brush and soften the edge. Let the deep chocolate fade into that warm brown. This is called “gradient blending” and it’s what makes the brownmakeup look expensive rather than messy. I sometimes add a second, even darker brown in the outermost corner for extra intensity, but only after the first layer is seamless.
Step 3: Adding Metallic Shimmer in the Center (Opens Up the Eye)
Here’s the fun part. Once the mattes are blended, pick a metallic shimmer – like a champagne gold or a bright bronze with fine shimmer particles. The picture shows a soft golden shimmer right in the center of the eyelid. That’s no accident. That little pop of light draws attention to the middle of your eye, making it look rounder and more awake.
I use a flat shader brush or even my ring finger. Press the shimmer onto the center of the lid, right over where your pupil sits when you’re looking straight ahead. Don’t drag it around. Pat it gently so the base layer stays undisturbed. The contrast between the matte dark edges and the reflective center is what gives that sultry evening look you want.
Honestly, this is the smokeyeye trick that changes your whole face. It prevents the dark from swallowing your eye. Without that central shimmer, a brown smokey eye can feel heavy and small. With it, the eye pops open. I sometimes add a tiny dot of the same shimmer in the inner corner for extra brightness.
The Blend Hack That Changes Everything (And Solves Most Makeup Mistakes)
You’ve probably heard a thousand blending tips. But here’s one that I swear by and it’s weirdly specific: after you finish all your shadow layers, take a clean, dry fluffy brush and dust a tiny bit of translucent powder right along the edge of your eyeshadow where it meets your brow bone. Just a dusting. Then blend that powder outward.
Wait – that sounds counterintuitive. But the powder acts as a buffer. It sheers out any remaining harsh lines and creates that airbrushed fade. I discovered this by accident when I was trying to fix a botched blend in a hurry. It works better than adding more shadow. Try it once and you’ll never go back. This is the most practical eyeshadowtips I can give you.
- Always tap off excess shadow before applying – a little goes a long way.
- Use a spoolie to brush away fallout between steps, not after everything is done.
- If your deep brown looks muddy, check if your transition shade is too cool-toned. Switch to a warmer bronze.
- Clean your blending brushes after each use on a towel – dirty brushes mix colors into mud.
- And for the love of all things makeup, never use a shimmer shade in the crease unless you want a glitter explosion that won’t blend.
I know, that list is a bit random. But those are the small makeupmistakes that add up. Fix them one at a time.
How to Avoid Common Shadow Fallout (A Practical Tangent)
Fallout is the enemy of a clean smokey eye. Deep browns and dark mattes often powder off onto your cheeks mid-application. And you don’t want to look like you got into a fight with a cocoa powder tin. So here’s my trick: do your eye makeup before your foundation. Or at least use a sticky tape barrier under your eyes.
Another thing: tap the brush handle before you bring it to your eye. This dislodges any loose particles that would fall later. I also keep a flat concealer brush handy to swipe away any stray shadow after the look is done. It’s faster than wiping and ruining your base. Honestly, I’d rather spend thirty seconds preventing fallout than ten minutes fixing it.
One more thing: if you’re using a cheap shadow that’s super powdery, wet your brush slightly with setting spray before dipping into a shimmer. It will pick up more pigment and less dust. That’s a hack I learned from a bridal makeup artist and it’s saved many a look.
Quick Tips for Long-Lasting Smokey Eyes (So Your Work Doesn’t Disappear)
A brown smokey eye that creases or fades by hour three is a tragedy. Use an eyeshadow primer – not just concealer. A real primer grips the product and prevents oil from breaking down the darker shades. I like the one from Urban Decay or even the drugstore ELF putty primer.
Set your primer with a thin layer of the transition shade before you start building color. That gives the shadows something to stick to. And if you have oily lids (I do, especially in summer), avoid cream shadows under the deep browns. Creams can shift and cause the dark to pool in the crease. Stick with matte bases.
Finally, after you finish the entire look, spray a setting mist a good eight inches from your face. Let it dry naturally. That minimizes fallout and melds the layers together. I’ve done this and my smokey eye stayed intact through a sweaty evening dance party. Not bad for a night look.
So there it is. The real path to a seamless brown smokey eye starts with ditching the shortcut and giving your crease that warm transition shade. Layer in the chocolate slowly, add a shimmer center, and use the powder hack if you need a reset. Practice it a couple times and you’ll nail that sultry bronze effect. Want to see how your next attempt turns out? Tag me or leave a comment – I’d love to hear which step made the biggest difference for you.
#smokeyeye #brownmakeup #eyeshadowtips #bronzetones #makeupmistakes
Leave a Comment