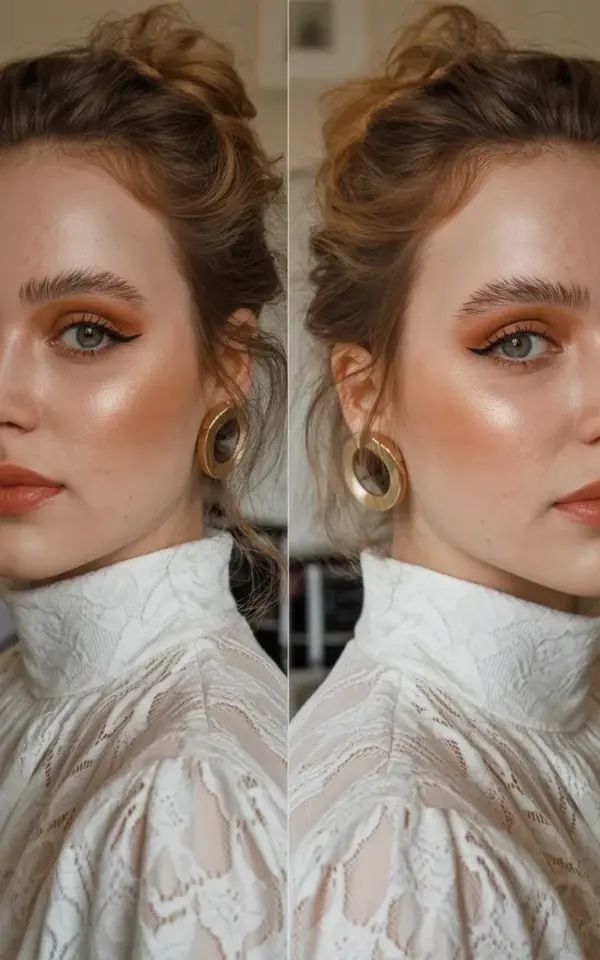
It’s one of those lazy Sunday afternoons where the light hits your mirror just right and you suddenly want to photograph yourself. But not in your usual go-to gym clothes. You want that soft, film-like beauty portrait aesthetic, the kind that looks expensive and effortless. The good news? You don’t need a pro artist or a high-end counter to get there. This specific look, built on warm brown eyeshadow, defined brows, and a nude lip, is completely achievable with a drugstore neutral palette and a good brow gel. Honestly, this budget makeup routine is the exact recreation of the diptych portrait I keep seeing all over my feed, the one with the white lace top and the messy updo. Let’s break down how to get it.
Why This Warm Brown Eyeshadow Look Works So Well
There’s a reason warm browns are the unofficial uniform of natural makeup. They mimic the natural shadows and warmth of your face, so the result reads as “you, but better.” Unlike cool grays or harsh blacks, a warm terracotta or soft cocoa shade melts into fair skin without looking like a separate entity sitting on your lid.
The portrait I’m referencing shows this perfectly. The model has that diffused, lived-in brown wash from lash line to crease, no harsh lines. It’s almost like the color was blown onto the skin with a whisper. For drugstore options, look for palettes that have a matte transition shade, a deeper warm brown for the outer corner, and maybe a soft shimmer that leans champagne or gold. You don’t need a forty-pan monster; a simple six-pan neutral kit will do the job.
Prepping Fair Skin Without Heavy Primer or Foundation
Here’s the thing about fair skin: it shows every bit of texture and redness, but it also shows when you’ve put on too much product. The glow in that beauty portrait isn’t from a heavy contour kit; it’s from skin that looks hydrated and alive. Skip the full-coverage foundation for this one. Instead, dab a light coverage tinted moisturizer or a skin tint onto the center of your face and blend outward.
I have a weird thing about my nose, it always gets red by the end of the day, so I keep a tiny bit of concealer there. But for the rest of my face, I let the freckles peek through. The lace blouse in the photo adds a delicate texture, and that vibe only works if your skin looks like skin. Set your T-zone with a translucent powder, but leave the high points of your cheeks bare to catch the light. That’s the trick to that warm glow.
Building the Eyeshadow: A Drugstore Technique for Depth
Ok so the key to this budget natural makeup look is the placement of the shadow. You aren’t going for a cut crease or a wing. You are going for a soft, rounded eye that looks smoky but gentle. Start by pressing a matte warm brown (think toasted almond, not rust) into the crease with a fluffy brush. Use a windshield wiper motion, but stop halfway and just blend in circles. Seriously, blend until your arm hurts a little, then blend some more.
Then, take a slightly deeper brown on a pencil brush and buff it along the lower lash line. This grounds the whole eye and makes your lashes look thicker without needing five coats of mascara. Finish by tapping a soft champagne shimmer onto the center of the lid. In the side profile view of that portrait, you can see exactly how this creates a dimensional eye that catches the light. It’s minimal effort, maximum payoff.
Defined Brows: The Secret to an Expensive Look
The brows in that photo are doing a lot of the heavy lifting. They are defined, brushed upward, and naturally fluffy. They aren’t instagram-baddie sharp, they’re polished but human. A good brow gel is your best friend here, and you can find brilliant ones at the drugstore for under ten bucks. I personally prefer a tinted gel to add a bit of color and volume to the actual hairs.
Here is a quick list of what you need to nail the brow game for this look:
- A tinted brow gel (clear works too, but tinted adds more definition)
- A skinny brow pencil for two or three little hair strokes in sparse areas
- A spoolie to brush everything up and out
Brush the gel up against the grain first to get the product into the roots, then brush it back down and sweep the tails out toward your temples. It takes me longer to find my mascara than it does to do my brows this way. Once you get the hang of the upward sweep, you’ll never go back to stiff, drawn-on arches.
The Nude Lip and Messy Updo: Finishing the Portrait Vibe
That natural-looking nude lip in the photo is another case of less being more. You want a shade that disappears into your lip but adds just enough pigment to look healthy. Look for a satin or cream finish, not matte, because the lighter reflects off the moisture. A nude with a hint of peach or pink works beautifully on fair skin. My current favorite is a drugstore lip crayon that costs less than my iced coffee, and it looks exactly like the model’s mouth in the right-hand photo.
And the hair? That messy updo is the romantic partner to the minimal makeup. Pull your hair back loosely, don’t worry about the bumps, and let a few tendrils fall around your face. The contrast between the structured lace top and the relaxed bun is what makes the whole portrait feel so dreamy. I usually achieve this look with a claw clip and two bobby pins, and it survives a full day of running errands.
Product List: The Exact Drugstore Essentials to Grab
Look, I know you want specifics. What should you actually buy? Here is a realistic shopping list that covers every base for this budget natural makeup look:
- Skin Tint: Something like the L’Oréal Paris True Match Nude Hyaluronic Tinted Serum (it’s lightweight and forgiving).
- Neutral Palette: The Milani Most Loved Mattes or the Maybelline The Nudes are both solid, reliable choices.
- Brow Gel: The ELF Wow Brow in the lightest shade is a cult favorite for a reason.
- Nude Lip: A Revlon Super Lustrous Lipstick in a shade like “Nude Slip” or “Mink.”
- Mascara: The Lash Sensational by Maybelline, it gives that fanned-out, natural volume.
You can also use a blush, but here’s a thought: use the same warm brown eyeshadow you used on your eyes, just a tiny tap on your cheekbones. It pulls the whole look together and costs you nothing extra. It seems weird, I know, but the monochromatic effect is exactly what makes this look so polished. That one trick is the reason the portrait feels so cohesive.
Keeping It Natural and Budget-Friendly All Year Round
The beauty of this setup is how it adapts to the seasons. In the summer, the skin tint looks great with a bit of a tan. In the winter, the warm brown shadows add a much-needed warmth to your face that fights off the seasonal pallor. This isn’t a trend that expires in six weeks. It’s a timeless, low-effort routine that works for school, work, or a date night where you want to look like “yourself but glowing.”
It also saves you a ton of money because you’re skipping the expensive primers, the complex contour kits, and the palettes with 20 shades you’ll never use. Stick to these simple products, and your beauty routine becomes a five-minute ritual, not a chore. The soft light in the portrait is honestly just good timing by the photographer, but the rest of the look, you can absolutely create on a Tuesday morning before work.
I hope this breakdown helps you recreate that exact beauty portrait vibe with stuff you can grab at your local CVS or Target. There’s something so satisfying about achieving a look that feels this expensive on a budget. If you try it out, tag me or send me a message, I’d love to see your version. Spend less time stressing over the perfect angles and more time just feeling pretty, that’s the whole point anyway.
Beauty
Comments are closed.